> For the complete documentation index, see [llms.txt](https://docs.wcproducts.com/welcome/llms.txt). Markdown versions of documentation pages are available by appending `.md` to page URLs; this page is available as [Markdown](https://docs.wcproducts.com/welcome/shop-accessories/super-pit/misc/legacy-products/legacy-single-upper-kit/steps-1-4.md).
# Steps 1-4
## Step 1
The installation of the Snap-in Nuts into the Horizontal Rails will be demonstrated below.
{% hint style="info" %}
The location of the Snap-in Nuts can vary as it is based on the bin sizes used.
{% endhint %}
{% tabs %}
{% tab title="Right Rail" %}
Insert the Snap-in Nuts into the corresponding slots.
{% hint style="info" %}
Repeat this step for the second Right Case Horizontal Rail
{% endhint %}
{% endtab %}
{% tab title="Left Rail" %}
Insert the Snap-in Nuts into the corresponding slots.
{% hint style="info" %}
Repeat this step for the second Left Case Horizontal Rail
{% endhint %}
{% endtab %}
{% endtabs %}
## Step 2
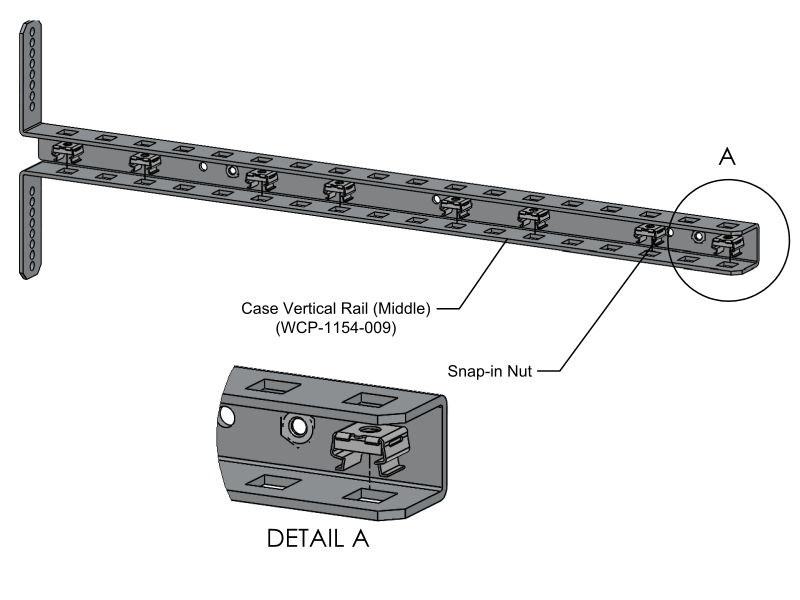
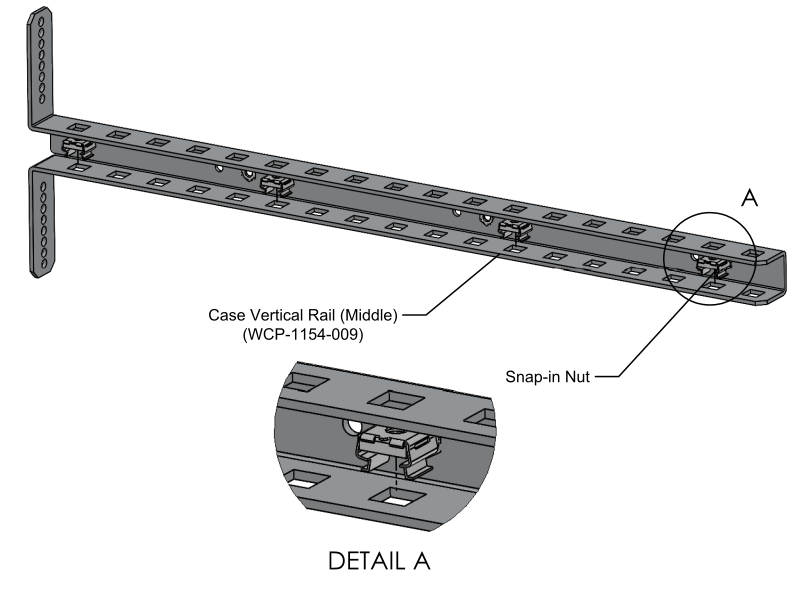
The installation of the Snap-in Nuts into the Vertical Rails will be demonstrated below.
{% hint style="info" %}
The location of the Snap-in Nuts can vary as it is based on the bin sizes used.
{% endhint %}
{% tabs %}
{% tab title="Left Rail" %}
Insert the Snap-in Nuts into the corresponding slots.
{% hint style="info" %}
Repeat this step for the second Left Case Vertical Rail
{% endhint %}
{% endtab %}
{% tab title="Right Rail" %}
Insert the Snap-in Nuts into the corresponding slots.
{% hint style="info" %}
Repeat this step for the second Right Case Vertical Rail
{% endhint %}
{% endtab %}
{% tab title="Middle Rail (Tube 1) " %}
Insert the Snap-in Nuts into the corresponding slots.
{% hint style="info" %}
Repeat this step for a second Middle Middle Rail (Tube 1)
{% endhint %}
{% endtab %}
{% tab title="Middle Rail (Tube 2)" %}
Insert the Snap-in Nuts into the corresponding slots.
{% hint style="info" %}
Repeat this step for a second Middle Middle Rail (Tube 2)
{% endhint %}
{% hint style="info" %}
The reference picture above shows the installation of half of the Snap-in Nuts that are needed. The picture below shows the finished product.
{% endhint %}
{% endtab %}
{% tab title="Middle Rail (Tube 3)" %}
Insert the Snap-in Nuts into the corresponding slots.
{% hint style="info" %}
Repeat this step until you have six of the Middle Rail (Tube 3).
{% endhint %}
{% hint style="info" %}
The reference picture above shows the installation of half of the Snap-in Nuts that are needed. The picture below shows the finished product.
{% endhint %}
{% endtab %}
{% endtabs %}
## Step 3
Take the Vertical Rail Tubes from Step 2 and install them onto the Horizontal Rail Tubes using #10-32 x 1/2" L bolts into the snap nuts.
The spacing of the vertical rails is based on the bin sizes used.
{% hint style="info" %}
Repeat this step for the other half of the Single Upper Kit.
{% endhint %}
## Step 4
Take the bin rails and install them onto the vertical rails using #10-32 x 1/2" L bolts into the snap nuts.
{% hint style="info" %}
Only install the bottom row of bin rails.
{% endhint %}
---
# Agent Instructions
This documentation is published with GitBook. GitBook is the documentation platform designed so that both humans and AI agents can read, navigate, and reason over technical content effectively. Learn more at gitbook.com.
## Querying This Documentation
If you need additional information that is not directly available in this page, you can query the documentation by asking a question.
Perform an HTTP GET request on the following URL with the `ask` and `goal` query parameters:
```
GET https://docs.wcproducts.com/welcome/shop-accessories/super-pit/misc/legacy-products/legacy-single-upper-kit/steps-1-4.md?ask=&goal=
```
`ask` is the immediate question: it should be specific, self-contained, and written in natural language.
`goal` is what the user is ultimately trying to achieve, the reason they need the answer. Sharing it helps GitBook give you a better, more relevant answer. A goal is most helpful when it describes the outcome the user wants rather than restating the question. For example, with `ask=how do I create an API token`, a goal like `automate deployments from our CI pipeline` lets GitBook tailor the answer to that use case.
The response will contain a direct answer to the question and relevant excerpts and sources from the documentation.
Use this mechanism when the answer is not explicitly present in the current page, you need clarification or additional context, or you want to retrieve related documentation sections.